A curbless shower can make a bathroom feel bigger, look cleaner, and work better for daily life – especially when safety and easy access matter. But the curbless shower installation process is not a simple swap from a standard shower. It changes the way the floor is built, how water is managed, and how the entire space needs to perform over time.
For homeowners in Richmond-area homes, that matters more than most people expect. Many bathrooms were not framed with a zero-threshold shower in mind, so the success of the project depends on what is under the tile, not just what you see when it is finished. A good-looking shower that is not properly sloped or waterproofed can turn into an expensive problem.
Why the curbless shower installation process is different
A traditional shower uses a curb to help keep water contained. A curbless design removes that barrier, which is exactly what makes it more attractive and more accessible. It also means there is less room for error.
The floor has to guide water to the drain without creating low spots where water sits. The surrounding bathroom floor often has to be considered as part of the shower system, especially in smaller spaces. Waterproofing becomes more critical, and layout choices matter more because every inch affects drainage, comfort, and code compliance.
That is why this type of project is usually best handled as part of a full or substantial bathroom remodel rather than as a quick upgrade.
Planning the space before demolition starts
The first step is evaluating whether the bathroom can support a curbless layout without creating bigger issues elsewhere. This includes measuring the room, checking floor framing, locating plumbing, and understanding how much height is available to recess the shower area or adjust the surrounding floor.
In some homes, the existing subfloor can be modified to create the slope needed for drainage. In others, the bathroom floor may need to be raised slightly to make the transition work. Both approaches can be valid. The right choice depends on structure, budget, and how the bathroom connects to nearby rooms.
This is also the point where practical decisions should be made. Homeowners often focus on tile and fixtures early, but the better questions are whether the shower needs aging-in-place features, whether a bench is worth the space, and whether a fixed glass panel or more open layout makes day-to-day use easier.
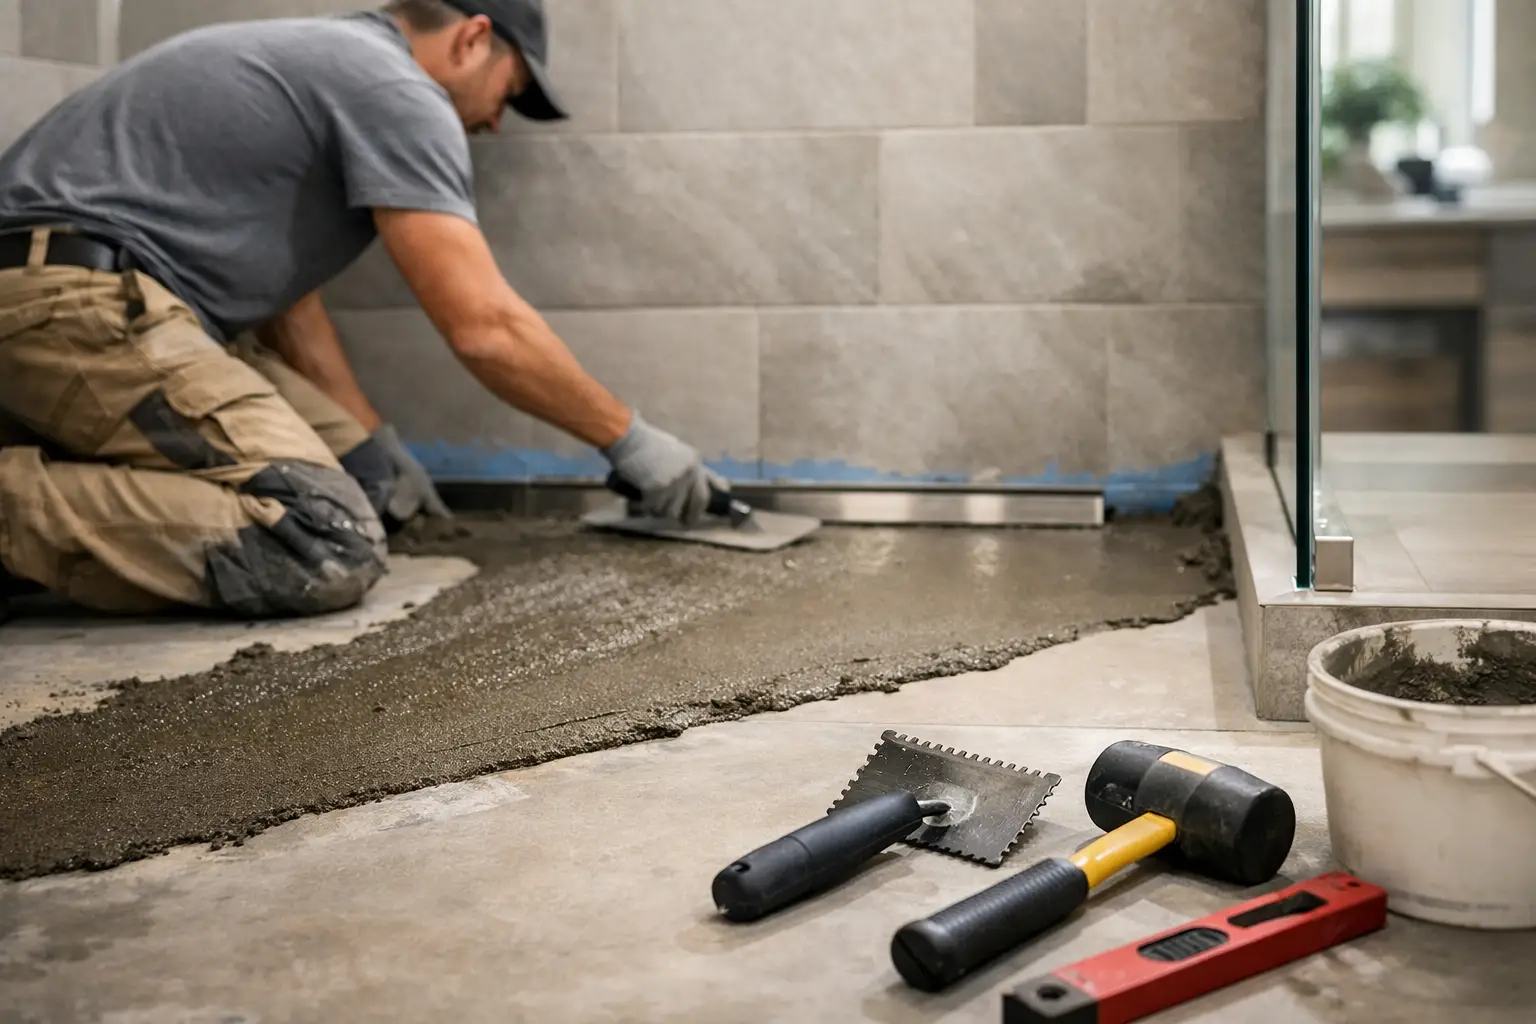
Demolition and structural preparation
Once the plan is set, demolition begins. The old shower, flooring, wall finishes, and sometimes sections of subfloor are removed so the framing and plumbing can be accessed. This stage can reveal hidden issues such as water damage, previous repair work, or framing that needs correction.
For a true curbless shower, the installer must create a floor assembly that allows water to move toward the drain without a raised threshold. That often means recessing the shower floor between joists, altering the subfloor height, or using a pre-sloped shower system designed for low-profile applications.
This part of the job is where craftsmanship shows. If the framing is off, even by a little, the finished tile may look fine at first but perform poorly. A homeowner may notice puddling, uneven cuts, or movement underfoot. Those are not finish problems. They usually start with preparation.
Plumbing and drain placement
Drain selection affects the entire installation. A center drain can work, but linear drains are often preferred in curbless showers because they allow for a single-direction slope and can simplify tile layout. They can also create a cleaner look, especially with larger-format tile.
That said, a linear drain is not automatically the better option. It can cost more, may require more precise placement, and needs to fit the room design. In some remodels, keeping or slightly adjusting the existing drain location may be the more budget-conscious choice.
The plumbing work must also account for water supply lines, valve placement, and any added features like handheld sprays or body sprays. If accessibility is a goal, this is the time to set controls at a convenient height and position them where the shower can be turned on without stepping directly into the water.
Waterproofing is the part you should care about most
Tile is not what makes a shower waterproof. The waterproofing system behind and beneath it does that job. In a curbless design, this layer is even more important because water can move beyond the shower footprint if the system is not properly built.
The shower floor and walls need a continuous waterproofing approach, whether that is a sheet membrane, liquid-applied membrane, or a complete manufacturer system. Transitions at corners, seams, drains, and wall-to-floor connections have to be detailed carefully. The bathroom floor outside the shower is often waterproofed as well, especially near the entry.
This is not an area where shortcuts pay off. A lower price can be tempting, but if the installer is vague about membranes, flood testing, or how the floor outside the shower is protected, that is a warning sign.
The slope has to feel right, not just measure right
One of the hardest parts of the curbless shower installation process is creating a slope that drains well without feeling awkward underfoot. Technically, the floor needs enough pitch to move water efficiently. Practically, it also needs to feel comfortable and stable.
Too little slope can lead to standing water. Too much can feel uneven or create a visual dip that looks poorly built. The larger the tile, the more complicated this can become, because some tile sizes and patterns are less forgiving on sloped surfaces.
That is why tile selection should support the installation, not fight it. Mosaic tile is often used on shower floors because it conforms more easily to slope changes and offers better slip resistance. Larger tile may still be possible, but it depends on the drain style and overall design.
Tile, glass, and finish work
Once the waterproofing and shower base are ready, tile installation begins. Layout matters here. A well-planned layout avoids awkward slivers, keeps lines clean, and helps the shower feel intentional rather than improvised.
Wall tile, floor tile, niches, benches, and transitions all need to work together. In a curbless shower, those transitions are especially visible because there is no curb to hide minor inconsistencies. The eye follows the floor line straight into the shower, so precision matters.
Glass is another decision with trade-offs. A fixed panel can help contain overspray while preserving the open feel people want. A completely open shower can look great, but it requires enough room and the right showerhead placement to avoid water escaping into the bathroom. What works in a large primary bath may not work well in a smaller hall bathroom.
What affects cost and timeline
Cost depends on more than finishes. Structural modification, plumbing relocation, waterproofing method, drain type, and tile complexity all affect the final number. A curbless shower usually costs more than a standard shower replacement because the labor and planning are more involved.
Timeline can vary for the same reasons. If the floor structure needs to be altered or hidden damage is found during demolition, the project may take longer. Custom tile work and special-order materials can also extend the schedule.
For most homeowners, the better question is not whether a curbless shower is the cheapest option. It is whether the added function, appearance, and long-term usability justify the investment. In many homes, especially where accessibility matters, the answer is yes.
Common mistakes homeowners should avoid
The biggest mistake is treating this as a cosmetic project. A curbless shower is a performance-driven installation. If the planning is weak, the finish materials cannot make up for it.
Another common mistake is choosing materials before confirming the floor system and drainage plan. It is easy to fall in love with a tile or layout online, only to find out it is a poor fit for the slope required. The best results come when design and construction decisions are made together.
It also helps to work with a contractor who understands how this shower will be used in real life. A beautiful bathroom is important, but so is making sure the space feels safe, drains correctly, cleans easily, and holds up for years. That practical approach is part of what homeowners should expect from a renovation partner like Old Dominion Innovations.
If you are considering this upgrade, think beyond the open look. A well-built curbless shower should make your bathroom easier to use every single day, and that starts long before the first tile is set.